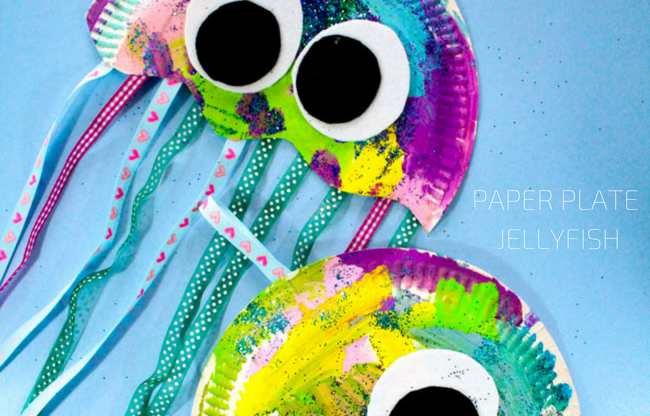
Get creative and have a go at making your own paper plate jellyfish with this fun and easy guide.
What you will need:
- Paper plate or a circle of card
- Washable paint or felt pens
- Glitter or other small items for decorating
- Ribbon, strips of coloured paper or strips of a plastic bag
- Felt (optional)
- Glue
- Scissors
- Stapler or tape
- If you don't have these items, be creative with what you do have, for example, cut up a cereal box instead of using a paper plate.
Instructions:
- Start by painting the paper plate. Let your child choose which colours they use and encourage them to notice how the colours change as they overlap and mix together.
- Add some glitter to create a glimmering effect. Or stick on other shiny items you have at home, such as sequins, sweet wrappers or kitchen foil.
- Wait for the paint and glue to dry.
- With a grown up's help, cut the bottom of the plate into a 'jellyfish shape' to make the body. Then turn the paper plate over.
- Cut strands of ribbon/strips of coloured paper or plastic bag to different lengths to make the jellyfish tentacles.
- Help your child to stick the tentacles on the back of the paper plate, along the cut edge.
- Cut out a pair of white and black circles to create eyes and add them to the jellyfish. Alternatively, your child might choose to paint or draw the eyes.
- Finish off by making a hanging hook using a small piece of ribbon or string and secure it to the top of the plate.
- Find somewhere to hang your jellyfish!
Watch the video
Top tips for creative activities!
- Let your child take the lead, and make decisions about colours, materials and how to join items together, this will help develop their creativity and problem solving skills.
- Encourage your child to do as much as they can independently, but be on hand to help them with tricky cutting, and the tidying up!
- Give lots of constructive praise as they work, for example, good idea, I think you're right, tape will work better OR you've really chosen those colours carefully, they look good.
- Chat and introduce new words as they're making, for example, tentacles, light green, dark blue.
Big thanks to Arty Crafty Kids for this idea!